

Pre-spaced pressure sensitive letters are computer cut from vinyl marking films. Vinyl letters and graphics are applied with an application tape for easy pre-spaced installation to any clean, dry, hard, smooth surface.
Before you begin your application, be sure the sign surface is free of dirt, grease and wax to ensure proper adhesion. (It is important to note that vinyl does not adhere well to porous surfaces such as concrete, unpainted wood and most vinyl wall coverings.. so we recommend whenever possible that you pre-test application to the surface prior to final installation.)
Upon arrival, check your order carefully to ensure the letters and graphics match your specifications.
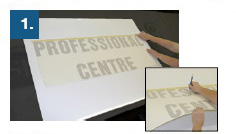
- Place graphic on sign surface in desired position, with pre-mask application tape facing up. (Note: Use bottom of straight-edge letters for alignment). Secure in place with masking tape across the top of the protective sheet (called "backing") to create a hinge. For easier application of larger characters or long backings.. cut between every second or third letter after the graphic has been aligned (inset).
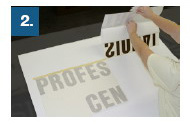
- Lift backing up away from sign surface, and carefully remove the front liner. This will expose the adhesive on the back of the graphic. Caution: Do not allow the graphic to touch the sign at this time.
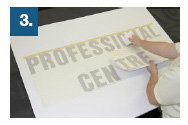
- Holding the graphic slightly away from the surface, begin application by squeegeeing along the top of entire graphic (download 1" to 2") to ensure a straight start and an even alignment and then continue to burnish down and outwardly with the squeegee.
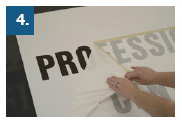
- After the graphic has been firmly suqueegeed, remove the pre-mask tape by peeling it back slowly at an angle of 180 degrees to the surface. When working in temperatures less than 60 degrees, allow the graphic a few minutes to adhere to the sign surface before peeling pre-mask.
- Quickly and effectively you have completed your customized sign message. If any air bubbles should appear, puncture with a pin and re-squeegee lightly to remove the air.
Wet Application
Dish detergent and water can be helpful with large graphics that are difficult to handle during installation. A wet application will help prevent the graphic from sticking firmly where you don't want it to from excessive air entrapment and from wrinkling. After Step 1 (above), lift backing up, and with a sponge, wet the surface slightly with soapy water (1 or 2 drops of detergent per cup of water) and then apply the vinyl graphic to the wet area. Working from the top with downward strokes, remove the excess water and foam from underneath the graphic with a squeegee. Gently dry and burnish the graphic with a clean cloth. With this application method, ultimate adhesion of the graphic is reached later than the dry method (24-48 hours( and we recommend that you re-squeegee firmly again a day after initial application.
