Parts Name and Description

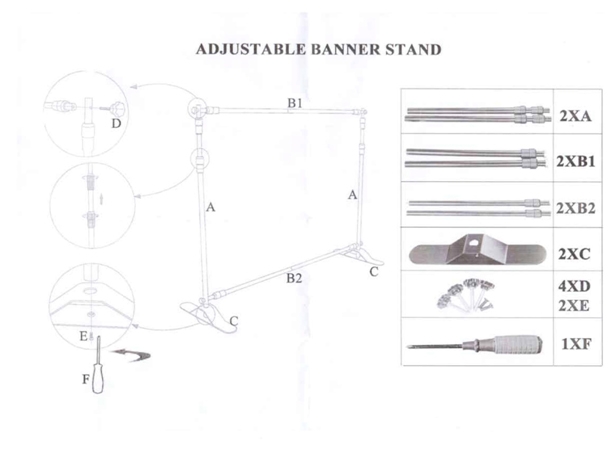
A. Vertical Poles
- Adjusts Up and Down from 36 "H to 96"H
- Has screw hole at the bottom. Fits into the Stand Feet(Part C) with the Screws (Part E).
B1&B2. Horizontal Poles
- Adjusts Left and Right from 36"W to 96"W
- Has screw holes at either ends. Fits into the Vertical Poles(Part A) with the Knob Screws (Part D).
- Goes into the Pole Pockets provided.
C. Stand Feet
- Included inside the box. CAUTION: Not included in the bag. Look inside the box.
- Holds Vertical Poles (Part A) in the hole provided with the Screws (Part E).
- Once out of the package, store it inside the Carrybag provided.
D. Knob Screws
- Screws with the Knob on one end.
- To be used with Horizontal Poles (Part B1&B2) to hold the backdrop.
E. Screws
- Your everyday screw to be used with Philips Driver (Part F).
- Fits into the screw hole in the bottom of the Vertical Poles (Part A).
F. Philips Driver
Assembly Instruction

Before the Set-up
- Make sure you have enough room to set up the backdrop
(About 10 Feet Wide by 10 Feet Long space or more). - Open up the package and make sure you have all the parts before Set-up.
- Take out the Backdrop from the tube and lay it out flat on the ground
Vertical Poles Set-up
- Take out the Stand Feet (Part C), Vertical Poles (Part A), and Screws (Part E).
- Put the Vertical Pole through the hole provided in the Stand Feet.
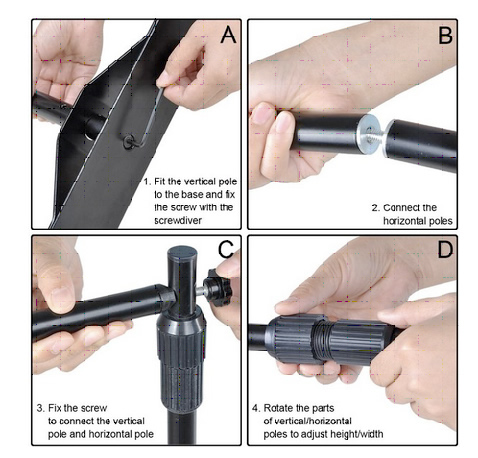
- Using the Philips Driver, screw in the Vertical Poles to the Stand Feet. (Picture A)*
Horizontal Pole Set-up
- Take out Horizontal Poles (Part B1&B2) and put them together through the screw and screw hole provided. You should have four poles and will end up with two assembled poles. (Picture B)
- Extend the poles to the width of the backdrop. (i.e. 8x8 Step and Repeat = 96"W Horizontal Poles)**
- Put the both Horizontal Poles into the Pole Pockets provided at Top and Bottom of the backdrop. Slide them in until the other end of the pole comes through the opposite end.
*Picture provided has different screw driver system than one you have. Do not panic. They work the same way.
**For 10x8 Step and Repeat, make sure Horizontal Poles are extended exactly 120 "W. If the poles are expended longer than that, the backdrop will "droop" in the middle.
Backdrop Set-Up
- Set the Vertical Poles and Stand Feet apart approximately the width of the backdrop.
- Take the bottom of the backdrop and assemble the bottom Horizontal Pole to the Vertical Poles using the 2 x Knob Screws provided. CAUTION: Make sure it is tightly screwed in. (Picture C)
- Next, take the top of the backdrop and repeat Step 2.
- Then, extend the Vertical Poles by loosening the knob (turn the knobs counter-clockwise). Once fully extended, tighten the bar by turning the knob clockwise. (Picture D)
- Repeat Step 4 until the backdrop is tightly set up.
- Your backdrop is now ready.
For any questions or assistance, please contact us at 1-888-789-1050 or you can email us at sales@sign11.com
Sign11 Inc. All rights reserved.
